SweetAllium
  • Blog
  • About
  • Projects
  • Gallery
  • Connect

Cinnamon, Rediscovered

4/17/2014

1 Comment

 
Picture
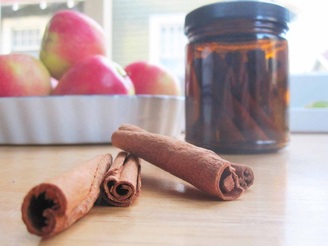
Behold, friends, an entire post dedicated to the magic that is cinnamon. See, me and cinnamon went way, way back. I thought I knew knew the herb--good ol' cinnamon, you know: tasty with apples, fun in a smoothie, a secret ingredient in a handful of savory dishes, even.

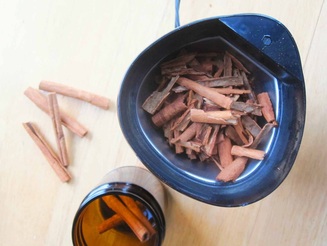
Then came the day I threw a few cinnamon sticks (also called quills) in my herb grinder.
That's when we really met, and I learned that cinnamon is less like a flavor of boxed cereal and much more like
a small fire that burns sweet, a gentle sun ray spiked with electricity, or a languid kitten that dreamily pricks you with its tiny claws. Oh, cinnamon.

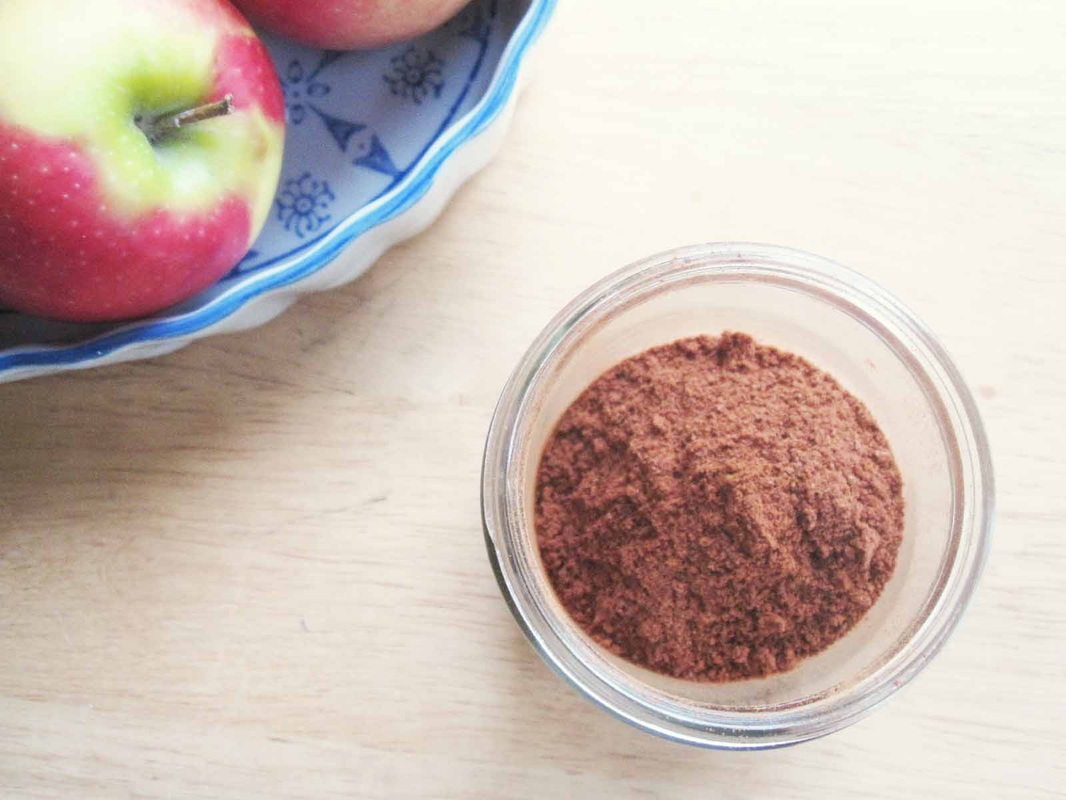
This transformation of the herb from familiar to delightfully powerful and somewhat exotic, is the effect of experiencing the plant in a more complete way. Grinding the herb right before using it eliminates the time that the ground herb sits around, all the while dissipating it's precious constituents directly into the air, or allowing light to break down the herb's natural chemicals. So, maybe cinnamon can serve as an example of how alive these fresh ground spices can be.

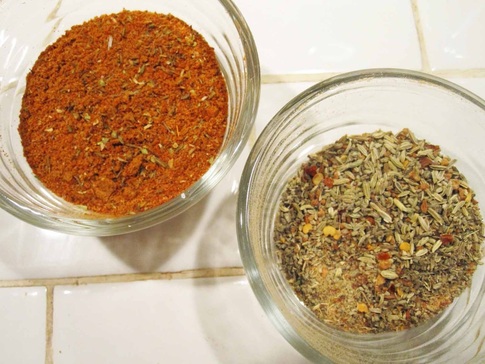
A couple years ago, I bit the bullet and bought myself a coffee grinder and dedicated it solely to herbs and spices (no coffee allowed!). The payoff has been all these super sexy new relationships with herbs I used to think were mundane. Mustard seed! Cumin! Black pepper, for crying out loud! Who knew black pepper had floral notes??

Picture
Grinding herbs at home isn't too complicated as long as you have a spice grinder (or coffee grinder, same thing) that you're willing to keep free of coffee beans. Just throw in your spice and press the only button on the machine!

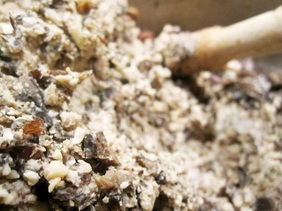
In the case of cinnamon, it's helpful to break up the quills into pieces. Sometimes wedging a table knife into the slits of the quills is the easiest way to break up a tough one.

If I'm being meticulous, I'll wash the grinder between each spice (to avoid contamination of herbs with each other). I've also heard of grinding rice between herbs as a way of "cleaning" the grinder. Do you have any good spice grinder tips?

Picture
1 Comment

Deli-Style Nutmeats: chorizo and finocchiona nut sausage

2/19/2014

0 Comments

 
Picture
Let's ruminate on fake meats for a moment. Depending on the brand, they're either outlandishly pointless or, actually, kind of tasty. Aside from picking out the right package from the freezer section, the other tricky part about fake meats is that they are very processed, forcing vegetarians, vegans and a few fake meat lovers into a quagmire of gums and modified starches if they just want some good salty spice and a decent mouthfeel. Despite these potential pitfalls, sometimes a girl just wants some non-meat chorizo, am I right?

Well, here’s a sweet DIY vegan and gluten free nutmeat that's full of protein and flavor, made only from real, down-to-earth ingredients--in two traditional sausage flavors: chorizo and finocchiona. The fun and challenge of this cooking project is that it requires some elbow grease. Soaked nuts and simmered mushrooms are muddled to get the right meat grinder texture. But it's ok, the exercise and the ensuing protein-packed meal will put you on track for some bangin' triceps.

Deli-style Nutmeats (Vegan, Gluten Free, Low Glycemic Load)

6 cups water
1 cup almonds
1 cup cashews
3 tablespoons salt
1 lb mushrooms (any kind)
Spice mix (choose one from below)
3 tablespoons apple cider vinegar
Chorizo Mix
1 tablespoon cumin, ground
1 teaspoon coriander, ground
5 whole cloves, ground
2 bay leaves, ground
1/2 teaspoon black pepper, ground
1/4 teaspoon cinnamon, ground
1/2 teaspoon oregano
1/2 teaspoon thyme
1 tablespoon powdered garlic
2 tablespoons paprika
1/2 teaspoon cayenne powder
2 teaspoons sea salt

Finocchiona Mix
2 tablespoons fennel, crushed
1 tablespoon powdered garlic
1 tablespoon rubbed sage
1 teaspoon black pepper, ground

1/4 teaspoon red pepper flakes
1 1/4 teaspoon paprika (for color)
2 teaspoons sea salt
Picture
Picture
Start this recipe at least 6 hours ahead of time by soaking the almonds in the water and salt. After two hours, add the cashews and soak for a few more hours, (but no more than 6, or the cashews will get a little slimy). Slice the mushrooms finely and simmer until they are limp. Add the drained nuts to the simmering mushrooms and reduce until almost all the water evaporates.

Next, roll up your sleeves, get out your muddler, and muddle those bad boys until you get a sticky consistency that looks a little like ground meat. This step takes some dedication and it's ok to take a break. When you've muddled the whole batch, give yourself a high five, and incorporate the spice mixture and the apple cider vinegar into the muddled nuts.

Picture
Use these nutmeats anywhere you would use sausage--nacho topping, squash stuffing, taco building, frittata filling--you get the idea. They brown nicely in a frying pan, but won't hold together like a sausage patty.

To save for later, divide quarter cup portions of the nutmeat and wrap these little morsels in parchment paper. Sealed in a plastic bag, these nut sausages will last months in the freezer, and are super handy for  tasty last-minute meal ideas.

I packaged these up into pretty gifts that look fresh from the neighborhood deli, by using parchment paper, printer paper and some rad custom labels from a sweet Portland-based company called Evermine (which also happens to be the entrepreneurial pride and joy of my parents, Jeanne and David).

Picture
0 Comments

Scary Good HabaƱero Sauce

10/22/2013

0 Comments

 
Picture
Well friends, I wouldn't have expected it, but its been over a year since my ode to hot sauces at my old blog, and it seems the sauces making their way out of my kitchen have come a long way. Last week I shared my long time favorite green salsa, Creamy Tomatillo Salsa, and this week, we're looking at a Halloween-y habañero.

 A friend introduced me to this bright orange habañero sauce and recipe, which he found nestled among other gems, I'm sure, at the self-respectingly self-deprecating, refreshingly unfrilly blog, foodpeoplewant.com. As long as you're into the heat, this sauce is the whole reason to keep eating whatever you put it on. Also, it was modeled after the ubiquitously loved habañero sauce by Portland's own Secret Aardvark, which is kind of saying a lot.

I adapted the recipe by dialing down the sugar in exchange for amping up the carrots and adding a yam. Also, less water means we can add less vinegar; and why bother with prepared mustard when we can go straight for some vibrant mustard seed powder? The end result is just as sultry, with a little more body, for folks who aren't shy of heat that you can slather on.

Scary Good Habañero Hot Sauce (GF, vegan)

1 can (14.5 oz) of diced tomatoes, including juice
1 cup apple cider vinegar
2 cups of peeled and grated carrots (packed into the measuring cup)
2 cups of finely diced white onion
2 tablespoons mustard seed powder
1 1/2 cups shredded Yam
9 habaneros, seeded
1/2 head garlic
2 teaspoons salt
1 teaspoon of black pepper
2 teaspoons curry powder
1/4 c honey (or sugar)
1 cup of water or just enough to cover

Throw all of the ingredients in a pot and simmer for 2-3 hours until all the veggies are soft and the flavors are well mixed. Unceremoniously, throw this thick soup into a blender and let 'er loose--blending to your liking. Jar it up and share with friends!

Picture
0 Comments

Salvaging Summer

7/9/2013

0 Comments

 
PictureSummer greens and quick pickled onions
With the end of the school year, I imagined July would bring ample leisure time--days filled with musing over which dish to bring to a barbeque and afternoons of gazing at clouds from a bed of perfect green grass. Instead, as I realize retrospectively every year, the pace of life quickens as the days get longer; a frenzy of projects and parties pulse through the hours as a languid sun procrastinates on its time-keeping duties. For me, life has aggressively filled my young summer schedule with some exciting developments:
• a new nephew! -and a fun medicine making project (ask me about it, I'll send you pics!)
• a move! -with my sweetie to a fabulous 1914 duplex which is, by chance, across the street from my kindergarten playground
• a massage business! -as promised on my About page, I've earned a massage therapy license in the state of Oregon (#19748, in case you're curious) and I'll soon be offering professional shiatsu massages. More on this coming soon!

What I really wanted to tell you today, though, is that I've been busy, and I've had to employ some of my favorite tricks for salvaging neglected summer vegetables. I thought maybe we could share tips. Sound good?

Here are a couple of mine (pictured above).

Liven the Greens
Wilty summer greens can be brought back to life by cutting off an inch or two of the stems under cold running water, and then placing them in a glass of water, like a bouquet of flowers. They'll liven up within a day, but use them soon after that or they will start to turn yellow or wilt again. If you have space to spare in the fridge, storing them in a glass of water will give them days of extra life.

Quick Pickled Onions
I just discovered this super easy way to avoid moldy onions, which are perhaps one of the saddest and most common kitchen tragedies that I see. Before the onion starts to go bad, slice it and submerge it in leftover sweet pickle juice--liquid from pickled beets in this case. This is a whole new way to do onions! So delicious! I enjoyed these ones on a couple sandwiches and a jaunty little dinner salad.

Holler if you have any super simple summer produce salvaging tips. I'd love to hear them!

Picture
Summer salad: quick pickled onions, almonds and almost-ripe peaches on a bed of lettuce with viniagrette
Picture
0 Comments

Simple Summer Slaw with Chutney

6/18/2013

0 Comments

 
PictureSummer Slaw: cabbage, chutney, coconut, onion, cilantro, nuts
Happy almost-solstice everyone!

In honor of summer, I've crafted another delightful picnic or barbeque side dish. I'm a big fan of this recipe because it is fresh, holds together well for a day or two in the fridge, and has a creaminess to it, without any dairy, expensive coconut milk or complicated nut pureé. Also, its an easy recipe to throw together, because the chutney takes care of all the complicated flavor work.

Simple Summer Slaw with Chutney (GF, lactose free, vegan)

3 cups red cabbage, chopped
1/2 cup chutney*
1/3 cup unsweetend shredded coconut
2 green onions, minced
A handful of cilantro, minced (optional)
1/2 cup sunflower seeds, pumpkin seeds or chopped almonds

Combine the cabbage, chutney, coconut, onions and cilantro. These guys can hang out together all day or in the fridge overnight, depending on how crunchy or soupy you like your slaw. I like to keep the nuts/seeds separate until serving time so they still pack some crunch. Top the slaw with the nuts or seeds as a garnish and serve. This recipe will serve 4-6 as a side dish.

*storebought chutneys are likely to have a lot more sugar and salt, so you may need to use less of them in this recipe. Check out the fabulous lower-sugar chuneys here at SweetAllium!

Picture
0 Comments

Nothing Cookies

5/21/2013

0 Comments

 
PictureGluten free, sugar free, dairy free, vegan cookies
My mom says that life is too short to waste on ugly cookies, but lately, especially after learning about the influences on our biochemistry of sugar, gluten and the glycemic load of some foods, I've been thinking that maybe life is too short to waste on cookies at all. I can think of at least a few things in life that I like way more than cookies.

Even so, I'm especially vulnerable to a good old fashioned cookie craving. It's familiar territory and I succumb to it more often than I'm proud to admit.

My solution? I made a cookie with nothing in it. I'll wean myself from these unhealthy habits with Nothing Cookies!

Obviously, they're not made of nothing because, there you see them right before you (Upper left, see? They're giving you a friendly wave now.). These cookies are gluten-free, sugar-free, dairy-free and vegan, which makes it sound like there must not be anything in them. But, actually there is stuff in them, and these things are pretty gosh-darn awesome, especially in regard to blood sugar regulation.

Replacing flour with steel cut oats reduces the glycemic load of the cookie, which means it won't make your poor liver and pancreas perform acrobatics around each other to manage the sweetness in your belly. Instead of sugar, banana is used, which admittedly has quite a lot of sugar itself, but at least it comes with a bunch of vitamins and minerals especially vitamin C and B6. Almond butter, here used as the oil source, endows the cookie with the protective powers of nuts, which have been shown to reduce the risk of type II diabetes when eaten regularly. Cinnamon is used by herbalists, Naturopathic doctors and in some nutriceuticals to help the body balance blood sugar. I used raisins out of convenience (which also unfortunately have a pretty high glycemic load), but a superfood cookie would instead don dried berries, like blackberries or blueberries, which are full of antioxidants and are suspected to help out with blood sugar balance.

Of course, eating these cookies as second lunch isn't going to help anyone's blood sugar. I think of it as training wheels--when I'm about to cave and reach for a sugary snack, having one of these around could save the day.

Nothing Cookies

4 super ripe bananas
1/2 cup almond butter (I suppose you could use peanut butter, which would make it a very peanutbuttery cookie.)
1/2 cup raisins or dried berries
1/2 teaspoon vanilla
2 teaspoons freshly ground cinnamon
1 teaspoon baking soda
1/4 teaspoon salt
2 cups steel cut oats
1/2 cup coconut

Mash the bananas in a bowl until they become syrupy, add the almond butter, vanilla, cinnamon, baking soda and salt with the bananas and combine. Mix in the oats and coconut. Press this dough onto a baking sheet covered by parchment paper. Bake until the cookies are slightly golden at the edges, 15-20 minutes, at 350˚F. Freeze for emergencies.

0 Comments

End-of-Winter Salad

5/7/2013

0 Comments

 
I know since you saw my last post about these charming little nut crunchies, that you wanted a little flair. Some color. A firework to help you understand why I would devote a whole post to some chopped up nuts.
Picture
Nut crunchies on pickled beets and avocado.
Well, here it is. Pickled beet, avocado and something-that-reminds-me-of-bacon salad. It works for winter because California avocados are actually in season around this time of year, and it's a good time to finish up any canned food on hand, before the fields and markets become populated again with fresh local produce. Also, nuts are amazing, if you hadn't heard.

Here's the recipe, but the first step is to curry enough favors from your friends until someone eventually gives you homemade pickled beets. This is when you've finally made it in this world. (Thanks for the beets, Eric!) 

Pickled Beet, Avocado and Nut Crunchy Salad

3/4 cup chopped pickled beets, gifted by a friend
1 ripe avocado
2 tablespoons nut crunchies (see recipe here)

Combine the ingredients. Do your best to share if anyone else is around.

0 Comments

Nut Crunchies - adding redundancy to the bacon bit

4/30/2013

0 Comments

 
Picture
Back when I was studying, and thinking of pursuing as a career, urban planning, I became smitten with the concept of resilience, which I now can't help but automatically apply to all systems that I care to think about--the human body, one's diet, my kitchen. My favorite definition of resilience is having the ability to return to an original functional state after a challenge has thrown the system out of balance. Here's an easy example: if you've got a fun group of friends and two of them who were together decide to break up, will your group of friends be able to eventually return back to normal again? Or will there be a rift making it impossible to ever hang out like you used to? If things can get completely back to normal then we could say your group of friends is pretty resilient. Maybe you could see how understanding the resilience of cities, businesses or biological systems could get really applicable and interesting, especially for us nerdy folk.

Two of my favorite nerds, Brian Walker and David Salt spell it all out in Resilience Thinking, which helps the lay person grasp some pretty powerful concepts. One that has stuck with me is the concept of redundancy, which basically means that in a resilient system, there are more than one way to do any single thing, like a kitchen with a flat cheese grater, a standing cheese grater, a cheese grater that you crank and a planer. It flies in the face of efficiency and optimization, but I can see how it makes sense.

I bring this all up now because, in the spirit of redundancy, I want to share a recipe for a little thing that acts a lot like a bacon bit, but I don't care to force it into a "replace your bacon bits" place--I wouldn't dare, dears, especially in this almost overpoweringly pro-bacon climate.

But seriously, these little peppery crunchy things are great, whether or not bacon exists in the world. My sweetheart is now obsessed with their salty crunch. We eat them on salads, breakfast potatoes, casseroles, avocados and any place a little bacon wouldn't be argued with. You can make this recipe in the oven but I recommend using a dehydrator.

Nut Crunchies

1 cup almonds (soaked in saltwater and then dehydrated is best, but any almonds will do)
3 tablespoons amino acids
1 teaspoon coarse ground pepper

Pulse the almonds in a food processor until the largest pieces are a little bigger than the size of a bacon bit. Combine all ingredients and spread flat on a dehydrator sheet. Dehydrate for a day or two until the nuts are completely dry. They will form flat sheets which can be used like bacon strips if you're careful, or break them up and store in an airtight container.

If you don't have a dehydrator, spread the combined ingredients flat on a baking sheet (lining the sheet with parchment paper will make a tidier experience) and bake at the lowest temperature your oven is capable of, checking occasionally to make sure the almonds aren't browning. If they do start to brown turn off the oven, keeping the oven door closed. After the oven has cooled check the bits to see if they have lost all their moisture. Repeat with another round of oven heat if necessary, checking again to make sure the nuts don't brown. Store in an airtight container.

Also, let's try this:

Submit
0 Comments

Chutney Bender

4/23/2013

2 Comments

 
Picture
There's a restaurant a short walk from campus that specializes in sandwiches, unfrilly coffee and dusty kitch. It's a cute little neighborhood joint, that doesn't pay much mind to us natural medicine students, except for the pile of gluten free pastries leaning against the cash register, and informal post-finals ceremonies of corking bottles of red wine for groups of exhausted and relieved students.

On one such post-finals let-down, I came across a sexy little sammie that they called an avocado melt: avocado, swiss, mayo and peach chutney--three delicious sources of fat and a single source of sweet, sour and spice. A winner! Once again, after its important role in the American taco, chutney proved itself a game changer.

So I went on a little chutney bender over spring break. But it was the best kind of bender; I made three recipes supplied by one of my new favorite cookbooks: Preserving Food without Freezing or Canning. I take it as a guide for resource management in a post-oil economy, but it could also just be a charming collection of traditional recipes from real French people. The authors are "The Gardeners and Farmers of Terre Vivante", Terre Vivante being a southeastern France-based research and education center focused around eco-farming, -gardening and -building. American hippies are great but I imagine French hippies have older recipes.

Turns out chutney doesn't have to be preserved. Back in its homeland, it's actually made fresh for each meal, but us busy city folks might like to put up a bunch of it at once, either to give us a self-righteous sense that we are industrious homesteaders, or to save on future dishwashing at the very least. Preserving Food without Freezing or Canning shares recipes for--of all things--how to can chutney, but unlike most canning recipes these don't require a 15 minute water bath, so maybe that's why the Terre Vivante editors don't count these as canning. Healthfully, the recipes are also intentionally relatively low sugar and vinegar compared with most chutney recipes.

Of the three varieties I tried--Apple, Mango and Onion--my favorite was the recipe I used for mango, because it's flexible and you can use any fruit and spices you want. I include my fruit and spice choices below, mostly just for you recipe followers out there. The rest of you, adapt away, but be careful with the volumes of the important things like fruit, vinegar and sugar which I assume are important to the chutney actually being preserved.

Fruit Chutney

2 lbs fruit and/or vegetables (I used mangoes and an onion)
1/3 cup brown sugar
1 cup vinegar
herbs and spices (I used 3 tablespoons ginger, 1 tablespoon red pepper flakes, and 1/3 cup raisins)

several canning jars with lids
clean towel
baking soda for washing
wide mouth funnel (very handy, but not necessary)

Wash and chop the fruit and cook along with the spices over medium heat until soft and reduced. Add the sugar and vinegar and continue to cook until you're happy with the consistency. While the chutney is cooking down, boil the lids (at least 5 minutes) wash the jars with boiling water and baking soda and set upside down on a clean towel. Fill each jar, one at a time, with very hot chutney, make sure the rim is clean, and cap. Twist the lids down tight and set aside to cool. If you've never undertaken a canning project, consult a grandma with a good canning track record, or a more traditional canning cookbook for tips and tricks.

2 Comments

Curried Squash Deviled Eggs

4/2/2013

1 Comment

 
Picture
A before and after of roasted blue hubbard squash
Easter brunch can be a tough one sometimes. Like Thanksgiving, I always walk away from the table lamenting all of my decisions for the past 30 minutes. It's a lovely problem to have too much food, but the type of food that us brunchers adore is the other half of the challenge.

After a lopsided over-sugary potluck brunch a few years ago (potlucks can be unlucky sometimes), I've vowed to bring only savory dishes to the Easter gathering. This year, I also happened to have six pounds of blue hubbard squash to use, so I ended up with a savory pumpkin butter that I called Curried Squash Mash with Feta Cheese and Spiced Pepitas. It's delicious, filling, and even though it's savory, the spices in the garam masala really bridge well with sweets, so it's a great side for brunch.

The fun part for me was inventing a new take on the deviled egg. I mean, if you have pounds of curried squash mash and a dozen decorated hard boiled eggs it's only a matter of time before something awesome happens. Right?

Curried Blue Hubbard Squash Mash

This is a great way to process the mountains of roasted squash guaranteed if you have at least one blue hubbard. Freeze what you can't eat in a week and consider a few of your future lunches already half-made. The mash is gluten free, lactose free and vegan, but, of course, topping it with cheese or substituting cream for nut butter changes a couple of those credentials. Topping this mash with fresh squeezed lemon and pepitas would make a delicious vegan version.

6 lbs roasted seeded and peeled blue hubbard squash
3 teaspoons salt
1 yellow onion, diced
3 tablespoons cooking oil
1 tablespoon garam masala
1 tablespoon curry powder
1/4 cup walnut or almond butter (or cream, if you're into that)
up to 1 tablespoon sugar
up to 1/4 cup apple cider vinegar

Heat the squash over medium heat and then mash with a potato masher until smooth. It may help to alternate mashing and cooking a few times, so this process may take a half hour. While the squash is becoming ever softer, smoother and more reduced, saute the onion in oil and salt until the onions are clear, then add the garam masala and curry powder and heat until the spices are fragrant, 1-2 minutes. Remove from heat and add this mixture, and the nut butter to the squash after you're happy with the squash consistency and confident that you wont want to mash it some more. Continue to reduce the squash until it is flavorful enough and sturdy enough to be a self-respecting side dish (How would it feel on a plate next to mashed potatoes?). Add a teaspoon of sugar and/or a tablespoon of vinegar at a time until the sugar balances the salt and the sharpness of the vinegar balances the mellowness of the squash. The final amount of vinegar and sugar will depend on the volume, flavor and moisture content of the squash. This can be served as a side dish and is super classy with crumbled feta cheese or fresh squeezed lemon and spiced pepitas.

Spiced Pepitas

Pepitas is synonymous with pumpkin seeds only it sounds sexier. These guys are great on pretty much anything, but yogurt, soup and curries are the first to jump to mind.

1 1/2 teaspoon sugar
pinch salt
1 teaspoon fresh ground nutmeg
1 teaspoon lemon zest
1/2 cup pumpkin seeds

Combine the sugar, salt, nutmeg and lemon zest in a small bowl and set it, along with a plate or parchment paper, within arms reach of your heat source. Heat the pumkin seeds in a dry pan over medium heat, stirring constantly. When all of the pumpkin seeds are puffed up and many of them have turned brown, add the sugar mixture and continue to stir until the sugar is melted. If the sugar doesn't start to melt within a few seconds, turn up the heat, continuing to stir constantly. Once the sugar has melted, immediately pour the seeds onto the plate or parchment paper and spread them out to cool.

Picture
Curried Squash Deviled Eggs with Crumbled Feta and Spiced Pepitas
Picture
Curried Blue Hubbard Squash Mash
Curried Squash Deviled Eggs with Crumbled Feta and Spiced Pepitas

Hard boiled eggs
Curried Squash Mash (see above)
Spiced Pepitas (see above)
Feta cheese, crumbled

Peel and halve the hard boiled eggs. Place the yolks in a bowl and set the halves aside. To the bowl add an amount of squash mash that is twice the volume of the yolks--it's ok to eyeball it. Incorporate the yolks into the mash, taste it and add more mash if you wish. Place a generous amount of mash into each egg half and sprinkle the eggs with crumbled feta and spiced pepitas.
Picture
Curried Squash Deviled Eggs: a party on a plate
1 Comment
<<Previous

    Author

    Lorraine Ferron is a medical student, writer, and food lover. Read more about her at SweetAllium's About page.

    Archives

    August 2014
    May 2014
    April 2014
    February 2014
    November 2013
    October 2013
    July 2013
    June 2013
    May 2013
    April 2013
    March 2013
    February 2013
    January 2013

    2011-2012

    Categories

    All
    Classical Chinese Medicine
    Gluten Free
    Herbal Preparations
    Herbal Preparations
    Lactose Free
    Low GL
    Low Glycemic Load
    Medicinal Herbs
    Med School
    Naturopathic Medicine
    Recipes
    Vegan

    RSS Feed

    Blogroll

    thelocalspoon
    101 cookbooks
    Licking the Plate
    wild heart medicine
    Maximum Wellness
    BeKindTellTheTruthEatGoodFood
    Our Global Kitchen
    HellaDelicious
    Nectar
    Not Without Salt
    Civil Eats
    Edible Portland
    Smitten Kitchen

Powered by Create your own unique website with customizable templates.